Monday, March 30, 2009
The Garden
Thursday, March 26, 2009
Sewing
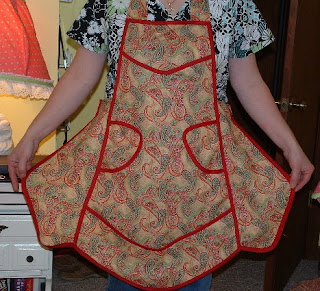
Here is my latest apron that I've sewn. The pattern is McCall's #3979. There are 5 different retro aprons you can sew from this pattern. This is (E) American Diner Apron. These are very simple to sew aprons. This apron I used 1/2" double-fold bias tape in brick red. I did make some modifications to the directions. I put my bias tape on first to the sections, and then sewed the pieces together. It was telling me to sew the pieces together, and add the bias tape to the over-lapping seam. I figured that could be tricky in some areas. I think next time I'll make two rolls of stitches along the bias tape. That second rolls of stitches would hide where I've had to attach my ties. I love this apron, and can't wait to wear it at work. (I work at a flower shop.) :0)

Saturday, March 14, 2009
Save Money On Electric Bill

We are a family of 4 living in a brick house that is roughly 1800 sq ft. We have 3 bedrooms, 2 baths, living room, dining room, country kitchen, laundry room, and office. My electric bill during the winter months is around $94. Our bill during the summer months runs about $150 to $175. Here are a few things that we do to save money on our electric bill:
- My house is 95% compact fluorescent light bulbs (CFL's). I did not change them out all at one time. As the old light bulbs burned out, I replaced them with CFL's. My outside flood lights have not been changed yet.
- I have energy star appliances. I have 2 refrigerators and 1 freezer. When the freezers start to get low with food. I fill up 2 liter soda bottles with water and freeze them to take up the extra space. When your freezer is full it uses less energy. I also clean the coils underneath the refrigerators and freezer every 2 to 3 months. They work harder if they are full of lint and trash. I bought a special brush just for this job, and I use a vacuum cleaner to suck up as much lint as I can.
- In the winter months we heat our home with a wood stove heater. We have Central heat & air; however, Our furnace is natural gas, so I try not to use it very often. You can purchase space heaters and use them to cut down on your central heating bill too.
- I have thermal drapes instead cotton ones over the windows. This helps keep the house warm during the winter, and cool during the summer months.
- I do all my cooking either on the stove, or in the oven. I try not to use both at one time. I also use the crock pot or George Foreman grill. The stove & oven takes a lot of energy, and they heat up your house during the summer. It's better to use a toaster oven to bake rolls. During the spring/summer months we use the gas grill outside.
- Laundry is washed in cold water, and hung outside on a clothesline. We only use the dryer when we are having rain for more than 3 days straight. You would not believe how much the dryer sucks up energy. It's an energy hog! Plus your clothes smell so much better when hung outside.
- Showers and baths are limited to 5 minutes at our house. This cuts down on the hot water tank. If you are in the shower for more than 5 minutes, then you are just standing under the hot water day dreaming. (LOL) I have teenagers in the house, who like to shower with music on. They know after 2 songs it's time to get out. Songs usually are 2 to 3 minutes long on average, so I figure 2 songs should be ample time to get clean. We also turn down the heat on the hot water heater. And when we go on vacation we cut it off.
- If you are cold, put on more clothes or get a blanket. If you are hot, turn on a ceiling fan. But by no means do we adjust the thermostat. Our thermostat stays on 65 degrees during the winter, and 78 degrees during the summer. The less you adjust your thermostat the better off you are. Your unit works harder and uses more energy if you flip back and forth between temps.
- I have replaced my kids desk top computers to lap tops. They use less energy. My computer is a desk top, but when I'm not using it I put it to sleep. And when I'm going to be away from it for a long period of time. I turn it off, and turn off the power strip.
- If you aren't using it, unplug it! All small appliances such as toasters, electric can openers, and microwave ovens should be unplugged. When they aren't in use, they still suck up energy. It's good to unplug chargers when not in use too.
- I only use the dishwasher when it's at full capacity.
"There can be no economy where there is no efficiency" - Benjamin Disraeli
Friday, March 13, 2009
My Worms
Raising worms is the most simplest thing you can do for your garden. Your plants will thank you for the worm compost by giving you lots of blooms and fruit. I'm going to show you how I raise my worms today :0)
There are 4400 species of worms out there in the world, but really you only want the red worm for your composting job. Red worms are known as the manure worms, and they grow quite quickly. They are less sensitive to the heat and sunlight than night crawlers. These worms don't borrow like your yard worms, but live on top eating, pooping, and having sex. Mmmm sounds like most men I know. LOL
Here is how I constructed my worm bin:
I use (2) 10 gallon dark containers. Worms like to be in the dark, so don't use anything that is clear. Then you will need to drill 1/4" holes in the bottom, top sides, and lid of your container. I think my holes here are bigger than 1/4". I think mine are 1/2". I got carried away with my husband's drill, and didn't pay attention to what bit I was using. LOL
Now you need to put bedding in your new worm home. Newspaper makes excellent bedding. You will need to shred the newspaper into 1" strips. The worms need bedding that is moist not soggy, so put your strips into a bucket of water and squeeze the excess water out of it. Cover the bottom of your bin with 3" to 4" of fluffed up newspaper. You will also need to throw in some dirt "grit" to help them digest their food. If you have and leaf litter or grass clippings, that can be added now also. Once your done you can add the worms to their new home.
I bought my worms at Gardens Alive online. You can check with your local bait stores or cooperative extension office for worm farmers in your area. Five hundred worms weigh about 1lb. If you start with less than a 1 lb, don't fret they multiply very quickly.
Worms like to eat healthy. They do not like dairy, meat, poo, or greasy foods. They love left over vegetable and fruit scraps. You can add crushed up egg shells, coffee grounds & filters, tea bags, bread, and cereal to their bin. You will need to bury it underneath the newspaper bedding. It takes them about 3 months to eat their bedding and food. When the bedding starts looking like the above picture, it's time to put the second bin on top. The worms will come up through the bottom holes of the 2nd bin to feed on fresh bedding and food. Then you can harvest the compost in the bottom bin.
Red worms reproduce very quickly. Mine have multiplied so, that I'm going to have to make another set of bins for them.
You will need to place cups, blocks, or flat rocks underneath your bins so the air can circulate underneath the bottom bin. I'm using flat stones to lift mine 1" or 2" off the bottom lid. The bottom lid does not have holes in it. It's there to catch any liquid that seeps down through the bins.
Trouble shooting problems with your worm bins:
- Worms are dying or trying to escape. Your bedding could be too wet, too dry, or bedding is used up. If it's too wet, add more bedding. If it's too dry, moisten your bedding. If it's used up, harvest your compost.
- The bin Stinks! Your bin might not be getting enough air. You will need to drill more holes. You could be putting too much food in there for your worms to eat. Stop feeding for 1 to 2 weeks. And again your bedding might be too wet, so add more newspaper bedding to it.
- I have fruit flies! Your food is exposed, so bury it deeper underneath the newspaper bedding.
And that's about it for raising worms! Enjoy!!!
Wednesday, March 11, 2009
Growing Potatoes In Trash Cans
This is my first attempt at growing potatoes. I've searched online for different ways to grow them. Old tires leak toxins into the soil, so that was not an option. Barrels seemed interesting; however, I would have to go out and buy one. I'm trying to be green and thrifty. Then I came across a site about growing them in trash cans. Brillant! I thought to myself. I have two plastic 30 gallon trash cans sitting in my greenhouse not being used. I drug them out to my husband's workshop, and started drilling 5/8 holes in the bottoms. I also drilled holes 6" up from the bottom. I've read that it's real important that potatoes have good drainage so they won't rot.

I then mixed top soil, manure, and 1 cup of 13/13/13 fertilizer, and filled the can 1/3 the way up.

Then I quartered my red potatoes around the eyes, and placed them eye up on the soil mixture in the can. I covered them with about 3 to 4 inches of soil.

After I planted them, I watered them from my rain barrels. I placed them in my green house for right now. We are expecting rain for the next 3 to 4 days, and I didn't want them to get too much water at first and rot. Once this front passes then I'll drag them back outside and water them as need be.
In addition to planting red potatoes, I also planted radishes and carrots. I've been reading "The Container Gardener's Bible," and I'm going to try growing veggies in containers this year. I've not had much success with root vegtables in this red Georgia clay soil, so this year I'm going to try growing them in containers.
I then mixed top soil, manure, and 1 cup of 13/13/13 fertilizer, and filled the can 1/3 the way up.
Then I quartered my red potatoes around the eyes, and placed them eye up on the soil mixture in the can. I covered them with about 3 to 4 inches of soil.
After I planted them, I watered them from my rain barrels. I placed them in my green house for right now. We are expecting rain for the next 3 to 4 days, and I didn't want them to get too much water at first and rot. Once this front passes then I'll drag them back outside and water them as need be.
Subscribe to:
Posts (Atom)